Pages

Tuesday, December 2, 2014

Drain line replacement

When Glendale was built 54 years ago, the contractor installed drain lines all over the course. In greens and tees, across fairways, all connecting into 6", 8", 10", or 12"lines running from the high side of the course and discharging into one the creeks. Usually they supply a set of as-built plans so the owner knows the location of all the lines for future use. We were supplied a set of "proposed" drain line locations, but some are in different locations, or not there at all. This creates a big challenge for us every time we need to do some digging on the golf course. When the original 1959 irrigation system was replaced in 1992, the irrigation contractor cut across lines all over the course. They repaired the drain lines that were visible to them during the trenching process. The lateral irrigation lines were pulled in place with a vertical plow and since we did not know the location of the drain lines, the plow ripped through drain lines everywhere. Some of these areas showed up the next year, some are just showing up today, 22 years later (I'd say we have repaired 150 drain lines since the new irrigation system was installed.) In all of the areas that we have done drainage work over the past 25 years, we have taken photos and made some drawings so we know where they are located. There are still many lines out there that we have no idea where they go or what gets tied into them. Several months ago a 3 foot deep sinkhole appeared  about 20 yards to the left of #4 green. It is in the rough and out of play so not many golfers even knew it was there. Since the course is frozen and closed today, we decided this was the right time to take out our new excavator and start digging.
 The photo above shows our Cat 304C excavator which we purchased this past summer. It is used but in very nice condition with just a little over 1100 hours on the meter. Once we started digging we found an old 6" concrete drain line that was broken. We continued digging along the pipe and found several repairs done years ago, more sections of pipe that were broken, and others areas of pipe full of tree roots. There were several large pine trees that were removed at this site four years ago, and two of the trees were planted directly on top of the drain line. This 6" line comes from up by #2 green, and ties into a 12" line near # 4 approach that empties into the creek by # 8 tee. We continued digging and when it was all done, we removed 105'of broken or clogged pipe.
 If you look closely at the photo above, you can see this area is full of old tree roots.
The new line is 3 1/2 feet deep. 6" ADS black drain pipe will be installed, covered with four inches of pea gravel, and the rest buried in sand to the surface. The ditch is flowing a steady stream of water, so this area should dry up and be in good shape for another 50+ years.
Steve Kealy
Golf Course Superintendent

Monday, November 3, 2014

Tree debris and clean up from 10/25/14 wind storm

The wind storm that passed through on Saturday night 10/25 left quite a mess on the golf course. Tree limbs and debris was scattered all over the course and our crew was only able to clear off greens and tees for play the next morning.
This photo shows #14 fairway as seen from the gold tee. Anytime we get a big storm with winds in the 30 - 50 mph range, it takes us about seven to ten working days to pick up all the tree debris. We blow everything off the fairways then hand rake it into piles and haul it away.
The left side of number one fairway being blown off into the rough.
Number 15 green shown above the next morning before it was blown off. The other thing that usually happens is all of the bunkers get washed out. Since we have a small weekend crew at this time of year, none of the bunkers were touched before play Sunday morning. The crew got them back into playing condition by Tuesday morning. The month of October was unusually wet and the rainfall total for the month was 6.65 inches, while the average is only 3.48 inches. We are doing our best to keep the course as playable as possible but we only mow when the weather allows us to do so.
Steve Kealy
Golf Course Sup't

Tuesday, September 23, 2014

Golf Course Etiquette 101: Divots, Ball-Marks, and Footprints.

The number one complaint I hear from golfers on the course at Glendale is actually three that come in a tie for first place.
1. Why are there so many divots on the course?
2. Why are there so many ball-marks on the greens?
3. Why are there so many footprints in the bunkers?

I have no good answer as the questions are the same today as they were twenty years ago. Golf is the only sport I can think of where there is no referee or official to supervise daily play. The game relies on the integrity of the individual player to follow the rules and show consideration for other players on the course. The photo below was taken yesterday (Monday morning after a busy weekend of golf at Glendale).
These are the divots that were picked up off the fairways before we mowed them. There are at least several hundred in the cart and almost every one of these divots could/should have been replaced. Some were filled with sand/seed divot mix, but many were not. It took three of our staff (myself and our two assistant supt's) 75 minutes each to pick up all these divots. That's 3.75 hours of labor to pick up the divots so we don't beat up our fairway mowers and leave a huge mess of chewed up divots after mowing. The amount of ball-marks on greens was similar to the amount of divots above. 10-20 on every green that needed to be repaired prior to mowing. Some of the bunkers looked like a well played in kids sandbox. Our staff is here to take care of all this each morning, but it's the golfers who played late on Sunday afternoon who had to deal with the poor course conditions. Golfers need to take ownership of their own fairway divots, ball-marks on greens, and footprints in bunkers.
It all comes down to having respect the game, the course that it's played on, and other players on the course.
Steve Kealy
Golf Course Superintendent

Friday, September 19, 2014

Temporary creek repair along #8 tee

The City of Bellevue hired a consultant to repair an area of the stream along #8 tee where a large section of the bank washed away.
All of the work shown above was done by hand as permits will be required for any permanent repairs. A log was laid along the toe of the slope, then 5 additional logs were laid across on an angle to the stream spaced about five feet apart. Holes were drilled through the top and bottom logs and six foot long pieces of re-bar were pounded through and into the bank. 
One long log was placed on top of the diagonal logs and anchored in place. Several large rocks were moved along the row to help keep them in position. 
The area between the bank and the logs was back filled with a series of coir logs (8 foot logs made out of a burlap type material) and tied down with rope. Then the entire area was filled with rocks from the stream bed. Several sections of a black screen material were placed along the stream bed to help catch small debris and prevent water from cutting underneath the structure. The consultant has a lot of experience working in urban streams and assured me that the design will work. If this design fails, the City will have to engineer a permanent solution and get permits for the project.

Tuesday, August 12, 2014

Keeping the course green and dry

During long stretches of dry warm weather as we've had this spring and summer, it's very challenging to keep the course dry and green. It's easy to keep the course green, but a lot of areas would be sloppy wet and the course won't play like it should. Differing soil types adjacent to each other, tree roots, sprinkler head spacing, shade, southern facing slopes, areas of the course without adequate sprinkler head coverage, sand capped  fairways bordering rough with no sand cap, and bunker edges are just some of the factors affecting how much water an area needs to stay green.
This wet spot is just off the left side of #6 fairway. The fairway is green and firm. The only way to get this area to dry out is to turn back the times on the three sprinklers that cover the area. But those three sprinklers also water part of the fairway. The wet spot will dry out and still be green but the fairway will get cooked. We could turn down the run times for the sprinklers but then the fairway would have to get hand watered every morning to keep it green. We adjust the run times on areas like this all over the golf curse every day in an attempt to keep everything as dry and green as possible. Two of the new tools we use to help us achieve dry and green conditions are hand held and in ground moisture meters. We have moisture meters installed in the root zone of three of our greens which show the moisture content of that green in real time. They are tied into our new irrigation control system and the numbers help us decide how much water to apply each night. We also use hand held moisture meters like the one pictured below.
These units are used on greens each day in the morning to determine how much more water is needed to be applied with a hand hose to get a desired moisture content level of 25 to 30%. Ten or twelve areas of each green are checked because of varying conditions on each green. Sometimes only one or two spots on a green need extra water from a hose. We have been able to keep the greens much more consistent from one to the next with use of these meters. We are also to keep them drier overall because we know exactly what each green is at each day.
We have two guys on our crew that do all of the daily watering, Tim Zadina (shown above) and Frank Walker. Tim does the back nine and Frank has the front nine. These guys know each green like the back of their hand and with the use of the moisture meters are able to check the problem areas on each green. Tim is shown above checking the 18th green. It takes him about three minutes to check all the spots on the green to determine which (if any) of those areas need additional water. We set the irrigation run times at night to be just on the low side so we don't over water, then check all the greens in the morning. It takes a lot of man hours but it's what is needed to keep the course as green and dry as possible. 

Thursday, July 31, 2014

Trying to get the bunkers just right

The golf course has been in good condition so far the past several months, but the pro shop still receives a lot of complaints about the bunkers. The sand is too hard, too soft, it's not consistent, and the ball plugs in the face every time are some of the most common remarks about the bunkers at Glendale. The maintenance crew has been working to try and get them just right for the past two months. We stopped raking the faces and sides of the sand to try and get it to firm up so balls won't plug there. After two months of raking with the back side of the rakes and just smearing the faces or not touching them at all, the sand has packed down and is firmer. Balls are not plugging in the faces. A shot hit into the face usually hits and rolls down into the bottom of the bunker. Problem #1 solved. In an attempt to get the bottoms of the bunkers to get firmer, we used leaf rakes and the sand got firm. Too firm for most players. So we are alternating rakes each week, one with teeth and the next week no teeth. I think we are getting very close to finding the best means of maintaining our bunkers. We still have root problems in all of the fairway bunkers but that will have to be dealt with this winter. Below is a photo of the right side green-side bunker at # 9 green.
Look closely and you can see the edges and bunker face are not raked. The bunker floor is lightly raked and the sand is firm. We will continue this program until the rainy weather returns in the fall and we have to change our maintenance to get conditions..............................just right.
Steve Kealy
Golf Course Superintendent

Wednesday, June 11, 2014

Course update; flagpole and bunkers.

The greens crew and I have been very busy since my last post four weeks ago. The drier than normal weather has turned our attention to mowing and maintaining the course for daily play. I have never seen the golf course this dry on June 11th, it looks more like July 25th.

The flag is back up and flying high at Glendale CC. The rope broke and we had to rent a lift to get to the top of the pole. I thought I could climb up  a 24' extension ladder and get the job done but the ladder was ten feet short of the top. The photo below show Kyle our assistant superintendent operating the lift, and the second photo is a view from 35' up on the lift.


The other thing I wanted to bring to your attention is an issue with our bunkers. Last summer I toured the course with some members of our board and green committee. There had been many complaints from our members about balls plugging in the face of some of our bunkers. So the decision was made to pull some of the sand off the steep faces to help prevent balls from plugging. We don't get any plugged lies during the rainy months because the sand gets packed down and is hard. As the weather gets warm and dry, the sand gets soft and balls start plugging again. Lately we have a bunch of complaints about hitting the sod liner, or what our members are calling "black dirt." If a shot is hit from one of the areas where sand has been removed to help prevent plugging, you will hit "black dirt." I went out this morning and moved a lot of sand to some thin areas in the left bunker at #1 green, and the right front bunker at #15 green. Below is a photo of the left bunker at #1 green.
The green side of the bunker has a face that is very prone to balls getting plugged. The slope extends back into the bunker about 8-10 feet at the mid point. It's hard not to plug the ball in that area. It's a function of the design. Check out the photo below of a new bunker at Tacoma Country and Golf Club. The sod extends further down the slope into the bunker. No steep face for the ball to get plugged. This may be the design we need as we are exploring the costs of a bunker remodel project in the green committee.


One more thing I would like to remind our members. When entering and exiting a bunker, please do it from the low side. It's easy to walk in and out and won't cause damage to the bunker edges. The photo below was taken this morning showing a foot size chunk taken out of the top of the left bunker on #1 green.

Wednesday, May 7, 2014

Trees VS turf, again!

In the continuing war of TREES vs turf at Glendale CC, the latest battle in progress is at the back of #8 tee. There is a large Western Red Cedar tree on the tee that is killing the turf and has been doing so for the past seven years. There is no place on the course with a tree this close to a tee. We have to trim branches every year that are in the way of golfers swinging the club when they tee off. 
 The back tee area shown has been re-sodded at least once every year since 2007. There are a combination of  conditions that favor the tree over the turf and continue to swing even further in the trees favor. 
As the tree grows over time, so does the root system that is taking moisture and nutrients from the soil on the tee. The tree's canopy gets bigger with time so the shade shadow it makes does too. The trees behind the 8th tee on the left side of #7 rough are also a big contributor to NO light getting to this area all winter. Between the tree roots and the lack of light, the slightest addition of any stress ( excessive moisture, heat, cold, aeration, sanding, growth regulators, foot traffic, etc.) causes the turf to melt away. We can re-sod again and that will get us into the summer when the turf will  check out due to heat stress from the weak root system of the new sod. We could abandon the back tee and set the black markers forward 15 yards, or remove the tree and have and have a decent stand of turf for play. That's the choice we have to make. If it were my decision, I would remove Goliath and let David survive and prosper. 

Thursday, April 24, 2014

Solid tine greens aeration

Monday April 14th was the day we aerated greens for spring 2014. The weather was 70 degrees and sunny which  is perfect conditions for aerating greens. The process was different than in all the years past, we used solid tines compared to hollow cores tines. Hollow core tines are the ones used to remove a core, solid tines punch a hole into the ground. The reason we aerate greens is to relieve soil compaction, get air to the plant roots, and create a space for sand to be placed in the root zone. Getting sand into the root zone is critical to dilute the amount of organic matter that accumulates in the soil. Organic matter comes from dead roots and shoots, and is increased by the amount of fertilizer and water used. A green that has excess organic matter is soft and spongy, doesn't drain well, shows visible foot prints from golfer foot traffic, and is not a good putting surface. Research at the University of Nebraska over the past 15 years has shown that the key to controlling organic matter build up in the soil is getting sand into the root zone. The method of sand placement can be done by several methods; deep verticutting , hollow tine core aeration, and solid tine aeration. As long as the amount of sand used is the same over the span of a year, all three methods work and dilute the organic content the same. We verticutt and lightly sand our greens every other week from May to September, and aerate with heavier sanding in April and September. In previous years we have always pulled a core when aerating greens, then filled the holes with sand. It's a difficult process to get the cores picked up without damaging the greens surface and getting sand to fill the holes. If the sand isn't dry enough it will bridge across the tops of the holes and not fill them. Driving equipment across the soft freshly aerated surface causes ruts in the green which take a lot of rolling to smooth out. Spacing between the holes is critical also. If they are too close together, the machine will almost roto-till  the surface. The tightest spacing with hollow cores we were able to use was  2" X 2". With solid tines we used a 1.5" X 2" spacing because there is less surface disruption compared to hollow core tines. We topdressed the green first and allowed the sand to dry, then aerated with solid tines and drove the sand into the holes. We then did a quick drag across the green to fill the holes all the way with sand. With solid tines we punched more holes and used more sand, caused minimal surface disruption, and cut the recovery time in half as compared to hollow core aeration. The greens are firmer from additional sand and will also drain better. I took samples from all the greens prior to aeration and sent them to a soils lab to have the organic content checked. I'll take samples next year at the same time to compare the levels of organic matter and the numbers should be lower. Photos of the entire process below show how the job was done.


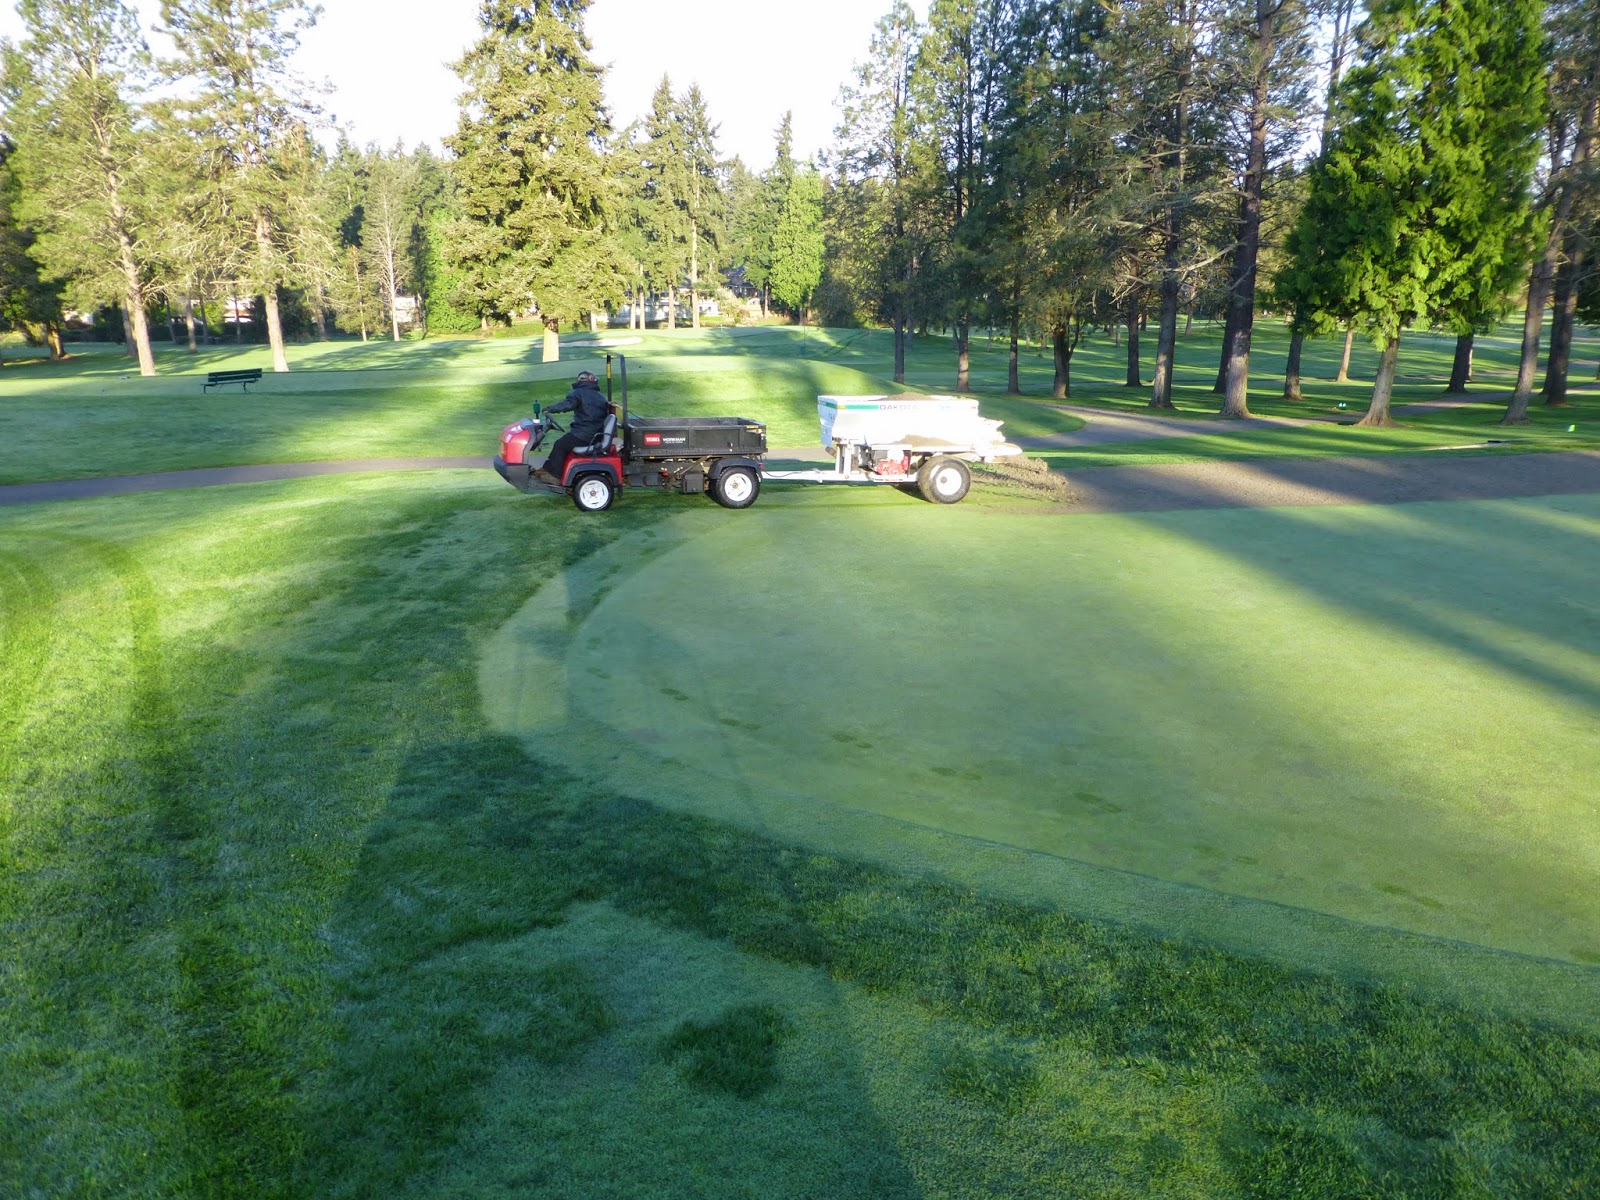
The first step is to spread a heavy layer of sand on the green and wait about four hours until it's dry.
                                                
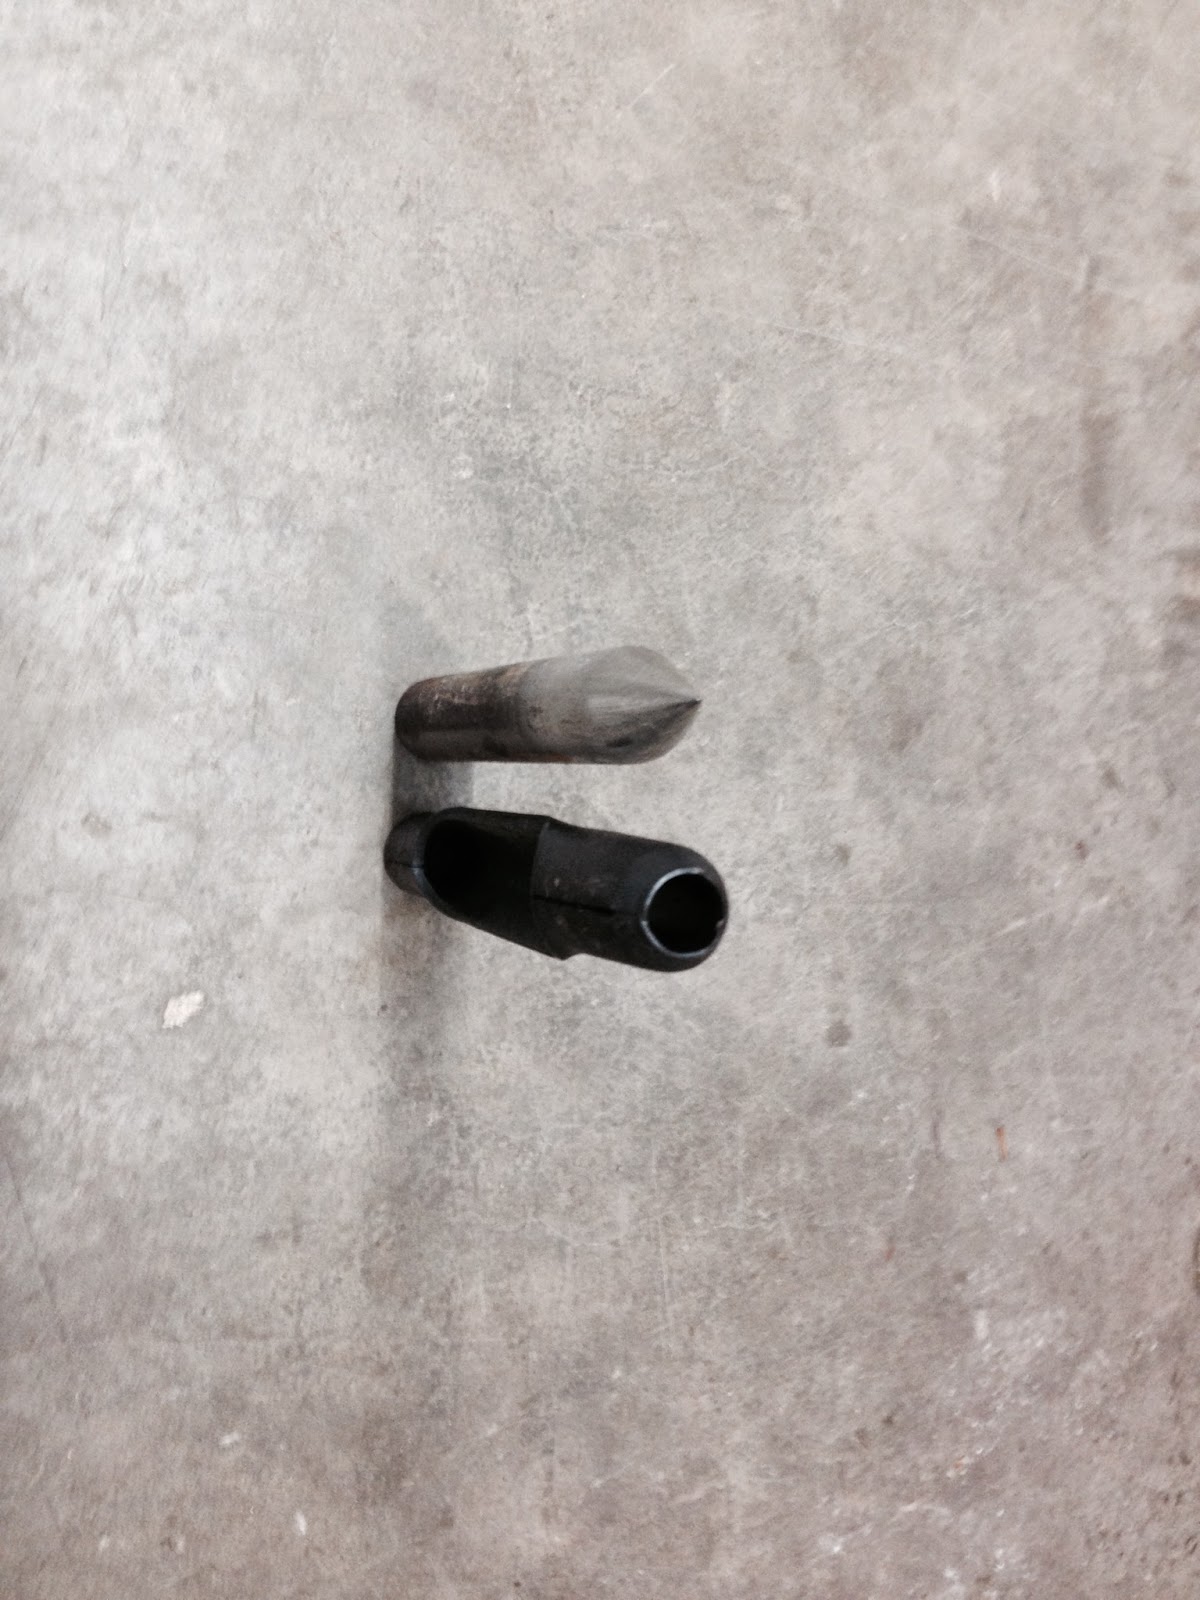
The two photos above show the difference between a solid tine (no core pulled) and a hollow core tine (pulls a core).

The green is then aerated with solid tines. Vibration from the machine helps drop more sand into the holes and windrow attachments mounted on the back of the aerator drag sand into holes not yet filled.
                                   
                              The 10 second video above shows the aerator at work.
                 The next step is to drag the green with a brush unit to even out the layer of sand.
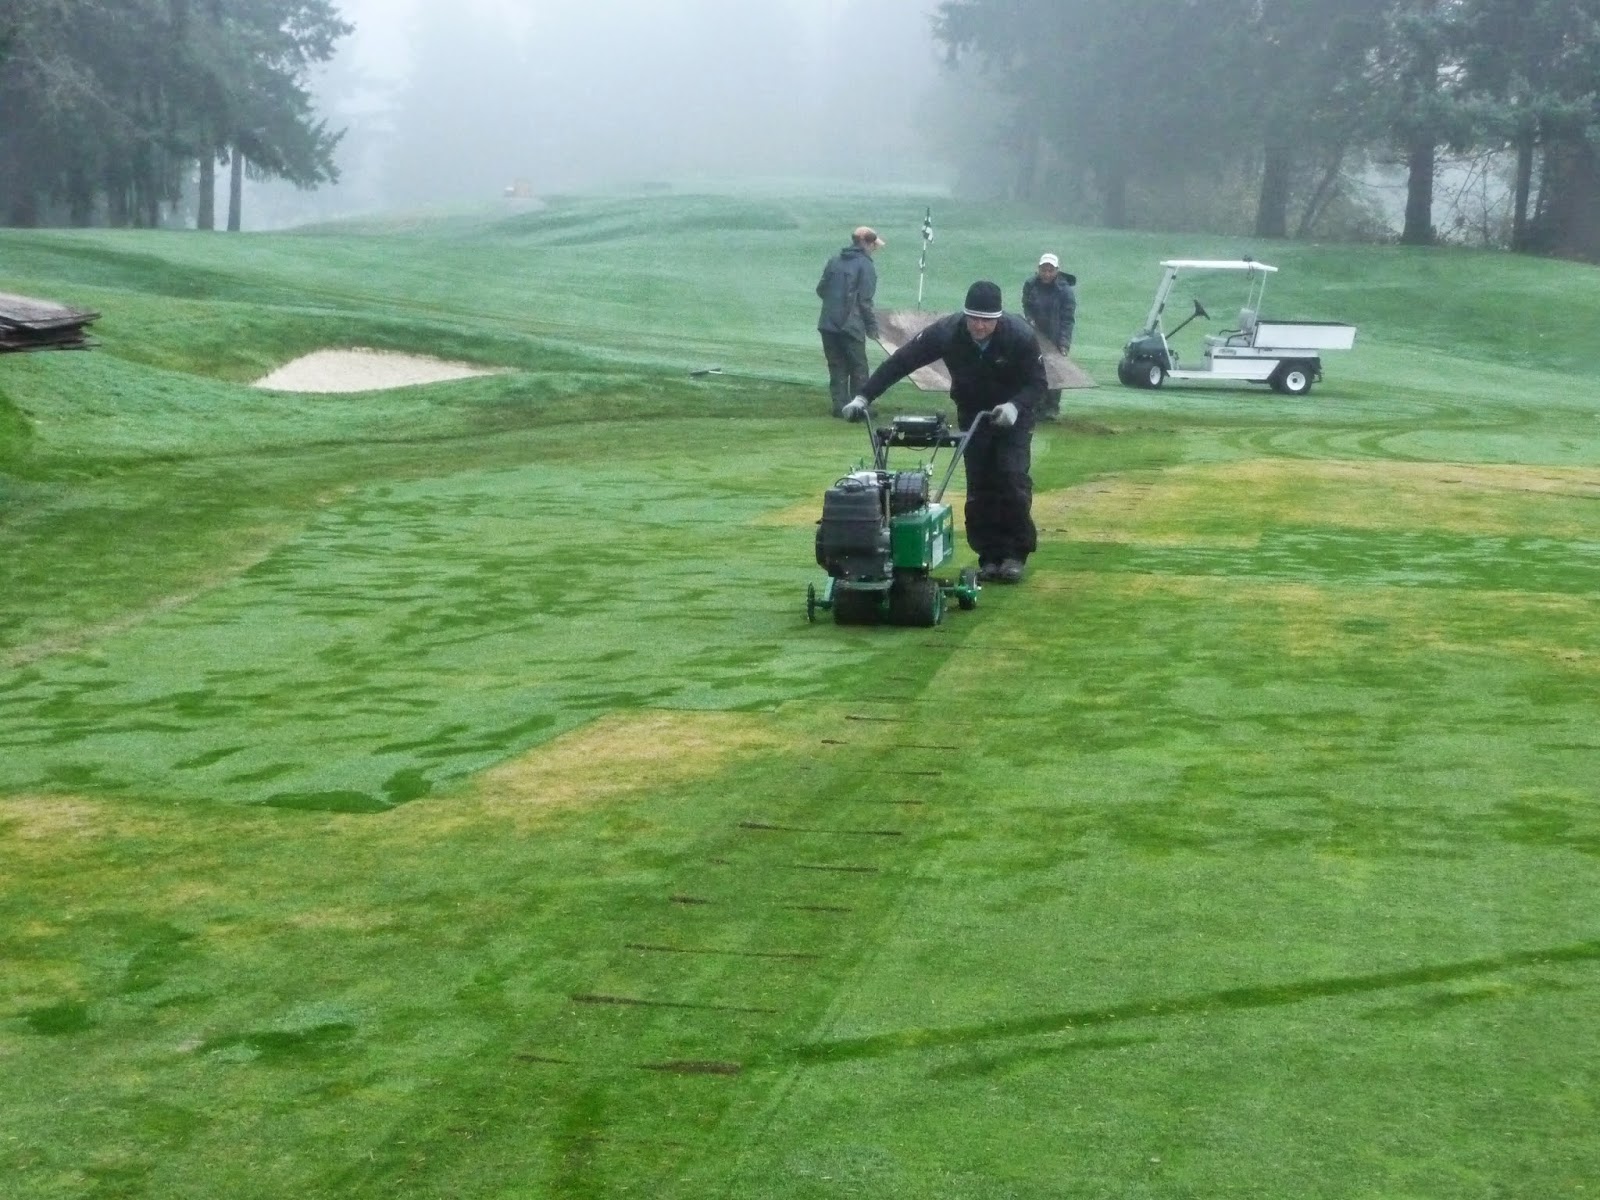
After the first drag, a verticutter is used to cut 1/4" deep grooves in the green to make additional space for sand on the green surface. It also fills in any remaining holes that are not filled. After verticutting we do one more quick drag and are ready to water the green for 20 minutes. Once all the greens have been watered, we are done with day one of the process.

 Day two of greens aeration starts with removal of excess sand. We use another brush unit that moves the sand to one end of the green where it can be picked up and hauled off.
We're getting close completion. Here you see Joel, Mario, and Nate blowing off excess sand on the 14th green.
The greens are then rolled two directions to smooth out the surface and we're done! All the holes are filled and this is what it looked like at the end of day two. The greens are ready for play and the recovery time to get back to normal is reduced by at least one week.

Wednesday, April 16, 2014

Trees -VS- Turf continued........

The three photos below were taken Monday April 14th at 3:00 pm. It was a beautiful sunny day, 68 degrees and perfect weather to aerate greens. The reason I show the photos is to see if you get the same feeling as I did when I drove up to the 12th and 15th greens. The amount of daylight we had on April 14th is the same as we'll get on August 28th. The first photo shows #14 green. 
The green is in full sun. I rolled up to check out this green with the sun in my face and I'm feeling great. Despite just getting aerated and sanded, the turf is happy too. 
I then headed over to #12 green to check it out. 
The green is shaded, but the trees are in full sun. Hmmmmm?  I drove over to #15 next.
Wow. Bright sunny day and it feels like stepping into a closet. Turn on the lights please! Decreased light equals decreased turf quality. You get the idea now of what caused the 15th green to fail in November of 2012, just 17 months ago. I like trees, but not next to greens where the turf suffers. In the battle of Trees -VS- Turf, the trees win every time. 

Wednesday, April 9, 2014

Trees -VS- Turf, who's the winner?

Trees are an integral part of most golf courses in the Pacific Northwest. When managed properly, they can co-exist with turf most of the time. The taller the turf, the better it gets along with trees. Tees and greens are the areas that don't like competition from trees for light and water. Short cut turf = short roots and the trees win the battle every time. The photos below were taken last week and show the left side of #12 green. Several members have asked me lately why the green has shrunk in size in that area. Over the past winter, the edge of the green was moved in (four feet at the mid point) because of stress caused by the big tree in front, and the other big one just off the left side of the green. This area becomes thin and turns to mud if we continue to mow it through the winter. It's full of tree roots competing with the turf for food and water, and the turf checks out for winter due to the lack of sunlight caused by the trees. Fungal diseases (especially cool season Pythium) are a problem from October through March due to the shade, so extra fungicide applications are made to this green.
Sixteen months ago the turf on the 15th green started showing severe signs of stress. We had done our fall aeration in early September and the green was not looking good (Fall aeration causes a lot of stress on weak shaded greens.) We babied it along for the next month, and in mid-October sprayed all the greens with a fungicide as part of our normal disease prevention program. The turf did not like the added stress from the fungicide application and took a turn for the worse. We re-sodded sections of the green, but the rest was getting worse. It got a case of cool season Pythium and that was all it took to push it over the edge. Here is a photo below of what it looked like on November 6, 2012. 
I was so disgusted by the condition of the turf that I decided we needed to replace the entire green. You can see my cart tracks where burned some rubber on the dead grass. That was my final goodbye to the past two months of stress I dealt with  over the condition of this green. 
Back to the shop for the sod cutter, and time to get to work.
The entire green was cut, cleared, and hauled off  to our compost pile. The sod we had been growing at the nursery on the 3rd hole was in perfect condition. It was built with greens aeration cores that I got from Seattle Golf Club the year before. We laid the new green in two days and it looked great. It was opened for play in three weeks and still looks good today. The only issue we still have with this green is the stress that caused the initial problems is still present. I can't guarantee that sometime in the future we have another turf failure. The photo below was take at 12:30 pm on November 7th, 2012. This green has shade over 1/3rd of the green at the time of day when the sun is at it highest point. At 2:00 pm it was completely covered in shade. This fall we plan to have Arborcom do shade analysis on both #12 and #15 greens. We'll take their recommendations and remove trees that are necessary to get the light needed to grow healthy turf. This time next year we should have more light on the greens and be confident that they will perform like the rest of the greens on the course.

Friday, April 4, 2014

Soil temps, growth regulators, and height of cut.

Spring is officially here and the turf is starting to wake up from a long winter nap. The soil temps are warming up slightly and growth on greens is slowly increasing day to day. The photo below shows the soil  temperature at a depth of 1 1/2" on the putting green is 50 degrees.
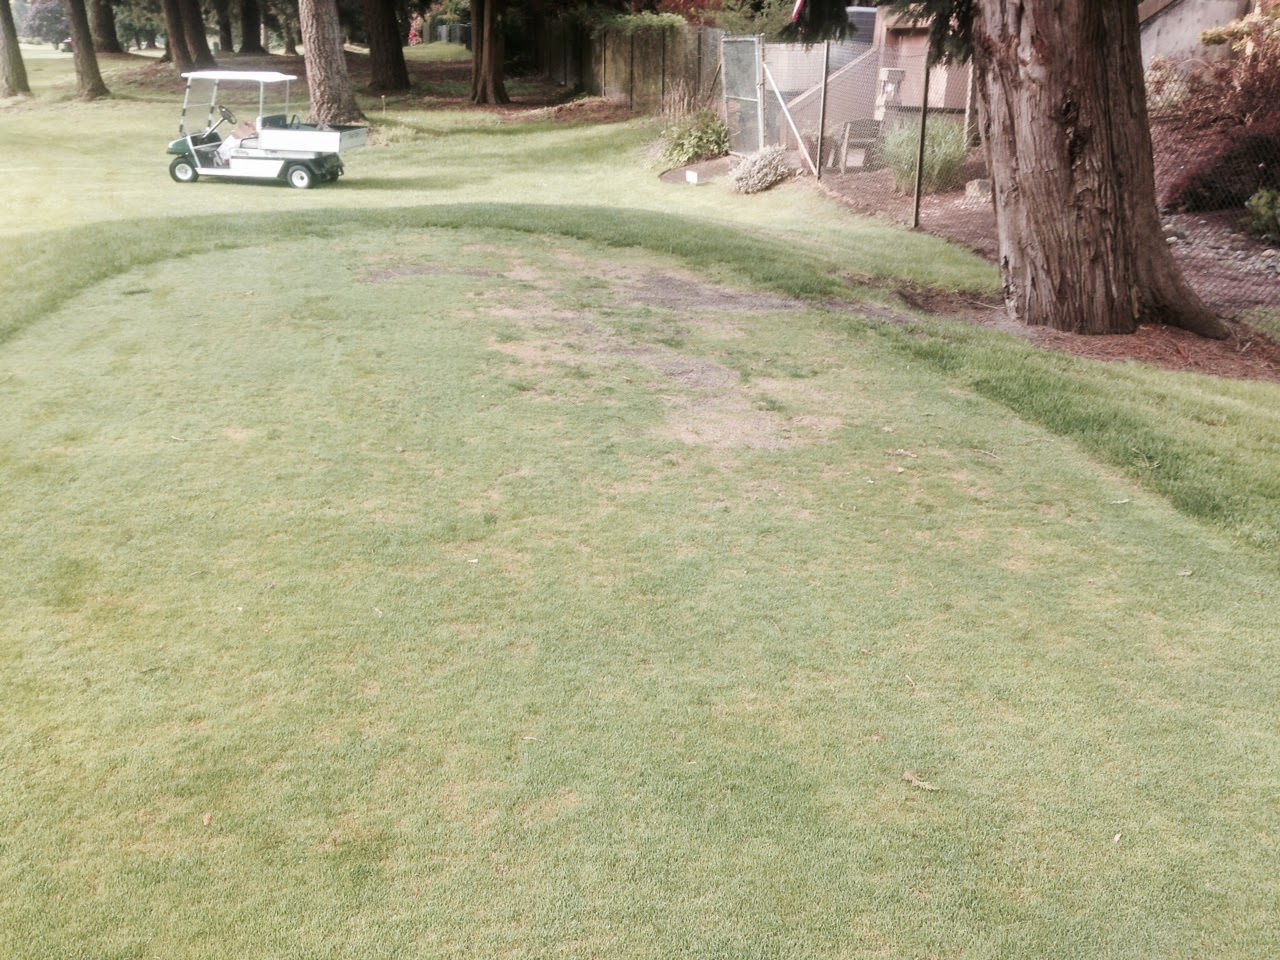
The color of the turf on greens is slightly off due to application of two different growth regulators in the month. We use a product called Proxy to suppress seed head development which was applied three weeks ago, and we'll follow up with a second application next week. This should keep the seed head numbers very low to none at all. It has a slight growth regulating effect and turns the turf a little off color. Two weeks ago we made our first application of the year of a product called Primo, which  causes the plant to grow laterally, not vertically. It causes the turf to become much denser because the plant puts all it's energy into lateral growth. We apply it for the entire season until it gets cold and wet in October. Our first Primo application always causes the turf to turn slightly yellow as you see in the photo below.
The color on the greens will improve in the next week as the turf gets used to living with the Primo. The height of cut on greens was lowered yesterday from our winter cutting height of .130 to .115. That is the thickness of four sheets of printer paper shown below. After spring aeration we will make our way down another 15 thousandths of an inch to our summer cutting height of .100.
The thickness of four sheets is actually 14 and 1/2 thousandths (.0145) not 15, but very, very close. We set the height of cut on our greens mowers with a gauge in the shop. In the field we check the actual cutting height with a prism gauge shown below.
The angle in the photo is not quite right, but if you look closely you can see that the height of cut is under .125 (an eighth of an inch). This shows that the bench setting and the actual height of cut are very close. 

Tuesday, April 1, 2014

Golf course updates for the week of 4/1/2014

Today's post will give an update of various things that are happening on the golf course. We removed a lot of Japanese Knotweed from along the creek on holes 6, 7, and 8 last fall. I like the look of the exposed creek,  and this season we are going to do our best to keep the Knotweed from taking over those areas. The photo below was taken last Friday and shows the Knotweed waking up from winter. Small plants have emerged all along the creek and soon it will be  time to make our first herbicide application. 
We can spray most of the plants close to the stream, but some of them are right along the edge and we can't get the spray mixture into the water. Those plants will have to be dealt with by other methods yet to be determined. The area shown below is between the walk bridge over the creek on #7 and the 8th tee. While this area does not look very attractive, at least it's better than twelve foot high Knotweed. 
All of the benches have been refinished and are back out on the course. Thanks to Deane Austin from our staff who spent two months over the winter doing the work.
New mats are here and were put out on the driving range tee this morning. 
We have just started the process of replacing all 192 green side sprinkler heads. Each head takes about 45 minutes to dig up and replace. The new heads offer several advantages to the 21 year old heads they are replacing. New nozzle technology produces a better spray pattern distribution, adjustable arcs, improved electronic valves to turn them on and off, and increased height when they pop up upon being turned on. 
In an effort to clean up the look of the course a little bit, all of the hazard and OB stakes are being replaced for opening day. Some of them were looking very tattered and bleached out from the sun.
Most of our time is currently being spent on mowing long grass. It's still very wet in some areas and we've gotten several mowers stuck in the mud today. Hopefully things will dry out soon so we can get the course in shape the golf season.